

New to Scrivener?
Intimidated by its interface?
I hear you.
When I first started using Scrivener, it felt like this:
If it wasn’t for a free webinar by Joseph Michael (of Learn Scrivener Fast) and Joanna Penn, I may never have gotten to grips with it.
There are courses that help you navigate it and to make the most out of it, but not all of us can afford that. It’s an investment in your future, I know, but it’s very long term investment, and I have bills to pay in the meantime.
Plus I’m just the kind of person that likes to read a lot and figure things out on my own.
The more tutorials I can read, the happier I am. I think I’m in the minority in that I’d much rather read a tutorial than watch one.
However, if you’re the kind of person that would rather watch a tutorial, you can check out my video here:
If you’re one of those people who prefers to read things, then read on as we delve into how to get started with Scrivener…
Step 1: Create your file
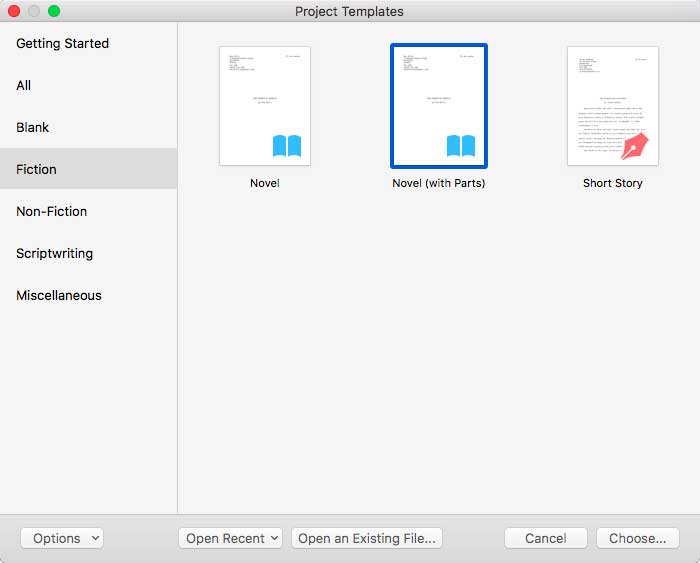
When you first open Scrivener, you’ll see this window.

Here you can choose from many different templates. This will affect what you see when you create your file, and also how it’s formatted, but you can change things later on (it’s not easy, but it can be done).
The video tutorials are worth a watch, particularly if you’re new to Scrivener.
For this tutorial, we’re going to choose a novel with parts.
Pick your file name and make sure it saves to somewhere you’ll remember.
Scrivener will remember your most recent files, but if you’re working on several different projects at once, or want to revisit an old one, it’s easy for them to get lost.
Step 2: Customisation
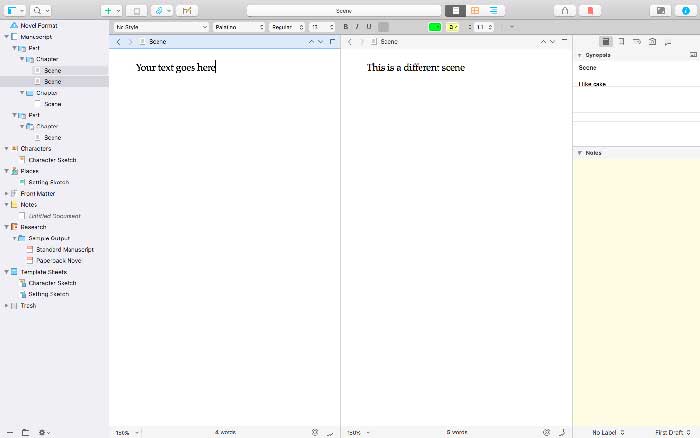
There are lots of different ways you can view Scrivener. I like to keep things clean, but have my notes along the side so that I know what needs to be changed.
If you want to completely block everything out, you can do that, too.
You can also have everything you need all in one place. This could be useful for editing, although I find having so much on the screen distracting. If you have a larger screen it probably won’t be such an issue, though (I use a 13” Macbook Air).
You also have the option to customise the ribbon along the top, although aside from liking the font bar to be displayed (which you can activate by pressing CMD + SHIFT + R), I haven’t really explored this. I like to keep it as clean, simple, and distraction-free as possible.
Step 3: Planning
You’ll want to check your backup settings before you do anything else so that you don’t lose anything.
One of my favourite things about Scrivener is that it automatically backs up if you’ve been inactive for two minutes. I’ve lost work in Microsoft Office far too many times and still can’t figure out how to change its auto backup feature to more than every half an hour, so this is perfect for me.
(Side note, if you do know how to change the auto backup on Microsoft Office 365 for Mac, I’d love to know what I’m missing!)
You have two main ways to help you plan your novel. The first is character descriptions, and the second is setting.
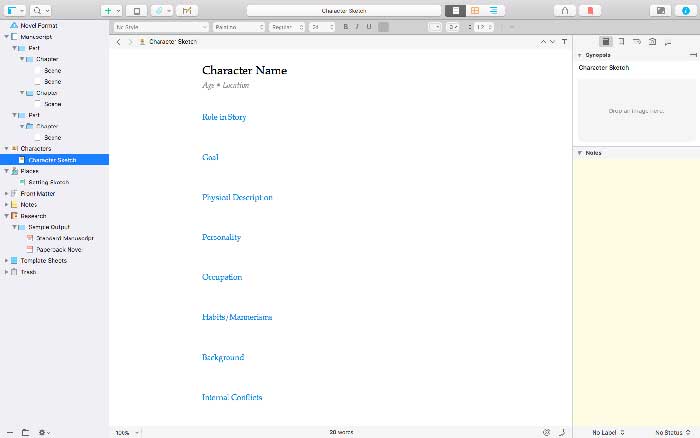
It gives you the basics that you need to know about each person and place, but I’d advise adding in more sections for character arcs, key scenes that happen in a particular location, and your character’s relationships with those around them. That way, you have a quick reference guide.
It’s easy to forget simple details when you haven’t worked on a project or series for a long time, so the more you can keep in one place, the easier it is to find it and the more time you’ll save.

Step 4: More planning
To map out your plot, you have several options. I like to create a table and turn it into a calendar. This helps me to have a reference of exactly what happens where. When you have lots of characters and a long time frame in your book, it’s easy to get lost!
To create a table in Scrivener, go to Insert -> Table.
You can then add in as many columns and rows as you need. I have found adding in lots used to upset Scrivener 2 and cause it to crash. I’m not sure if that was fixed in updates though, as I haven’t needed to use the feature in Scrivener 2 for a year or so.

I have yet to need to use tables as intensely in Scrivener 3 as I did when working on What Happens in London, but I have so far found it to be an easier and faster process.
If you’re not a fan of tables, you can also use the corkboard view.

Each note on the corkboard corresponds to a different scene, chapter, or part, depending on which view you’ve chosen. You can then add what you want to include in each section. When you go back to write your chapter, you can view your corkboard for that section on the left to make sure you don’t veer off track.
Step 5: Start writing
Finally—time for the fun part.
Each folder is a chapter or subchapter of your novel. Each separate document is a section of your novel (think the sections you see in a novel separated by an asterisk). I like to use different documents for different scenes. They can always be combined—or split—later on if necessary.

My favourite feature of Scrivener is the ability to view your file in different ways. You can focus on a particular scene or document, on a whole chapter, several chapters, or the manuscript as a whole. This is called Scrivenings.
Depending on which stage of the writing process you’re at—and your personal preference—will depend on how you prefer to view your work in progress.
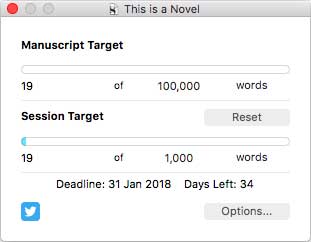
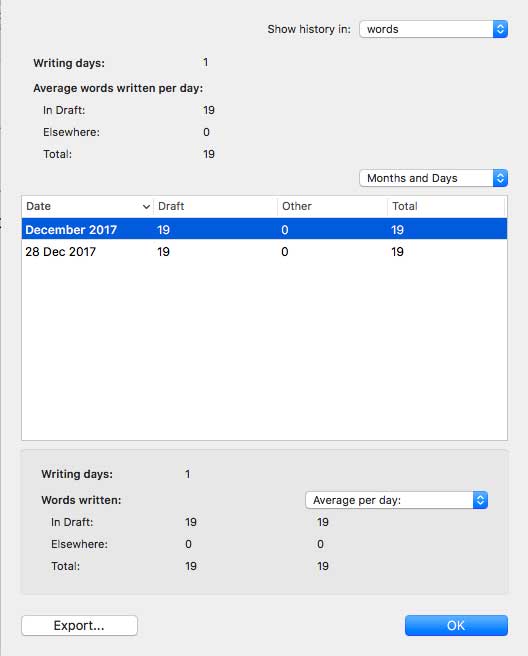
Step 6: Track your progress
Scrivener 2 had some great progress tracking features, and they’ve expanded on this in Scrivener 3.
By pressing CMD + SHIFT + T you can see how much you’ve written in your writing session, and how much you have left to go. You can also tweet your word count from this window if you’ve linked it to your Twitter account.
If you want to go into more depth, you can see how far you’ve come by going to Project -> Writing History. This only works on pieces you’ve written in Scrivener 3. Because this is a new Scrivener 3 feature, it doesn’t track this much detail from files created in Scrivener 2.
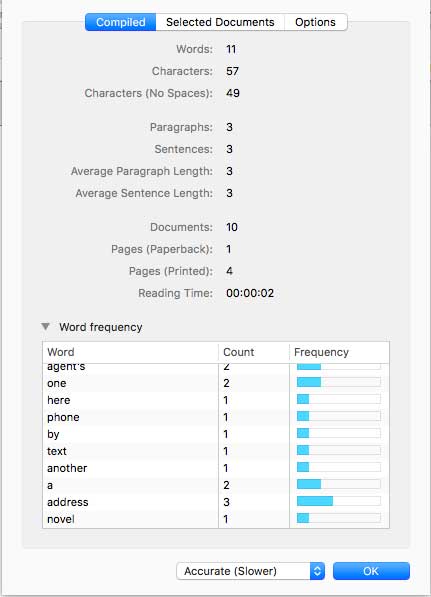
As well as this, you can see statistics such as reading time, word frequency, and average sentence length by going to Project -> Statistics.
There you have it!
That’s all you need to know to get started with Scrivener. There are tonnes more features that I haven’t covered in this tutorial, but I wanted to stick to the basics and those that you’ll find most useful when you get started writing your novel. If you have any questions or other Scrivener features you’d like me to do a tutorial on, let me know in the comments or tweet @KristinaAuthor.
Want to find out more about Scrivener?
You can check out my post on How Scrivener Changed my Life, Scrivener 3 review, and a comparison of Scrivener and Novlr.
Ready to download Scrivener?
Don’t forget, you get a free trial that lasts for 30 days of use, so you can refer back to this guide whenever you need it! 😉
Originally published on 11 January, 2018.


This was a really useful guide, thanks for sharing! I’m definitely someone who prefers to read tutorials and go at my own pace, rather than sitting through video instructions, so this was perfect. Although I’m yet to take the Scrivener plunge, this blog post has got me considerably more excited about it and will make me less scared to start using it.
Thanks! I’m glad it’s not just me. If you have any other Scrivener-related questions, let me know 🙂
Thanks for taking the time to review this. I downloaded Scrivner yesterday and admittedly I am a little overwhelmed with all the new options. It’s nice to see how simple it really is to dive in and get started. Hope your New Year is treating you well.
xo
Kristina: I am just trying to take a massive disorganized project and put it into Scrivener. I’m attempting to write a braided memoir, which involves research of the local adoption industry in the 1950s (quite corrupt) through which I was adopted. I’m using the template of the hero’s journey, in 12 stages. Right now I want the “chapter” divisions to be the 12 stages. I have material to go into each of them, but I don’t know how or where to keep track of information describing specifically what each stage entails, in addition to my notes and thoughts on each stage, which are not chapters written on the stages. Corkboard? If so, how do I do that with a stage that doesn’t yet have anything in it? I really need hand holding in some areas, and I have lots of material in others. I can’t find anything that says, “Put this here, and do it this way”. Is there some way to make an outline that contains the old fashioned Roman numerals, capital letters, etc.?